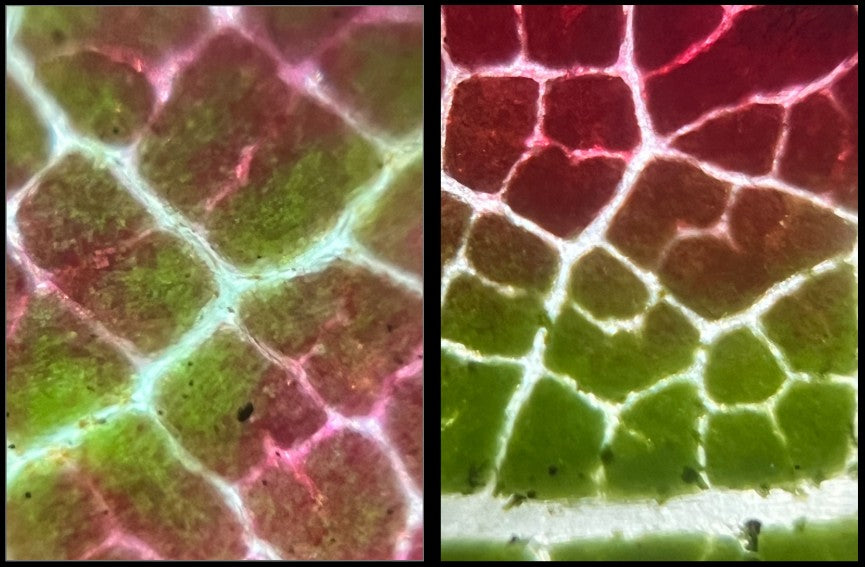
Question:
What color are leaves?
Spring is the time of year when people begin growing their gardens. And the joy of seeing a seedling poking through the soil makes it worth the effort! With all of the plants beginning their growth cycles as winter’s cold starts to recede, it is the perfect time to take out your Foldscope, improve your close observation skills, and take a look at plant leaves.
This activity works whether you have a classroom set of Foldscope 2.0s or Foldscope Minis. So grab your Foldscopes and read on for a fun way to get your students outside, making observations, and analyzing data. It’s time to explore the beauty of leaves.

Background:
It is a common thing for schools to give students bean seeds to observe the sprouting process. Some schools even have gardens for students to plant seeds and grow vegetables, fruits, and flowers. It is important to note that you don’t have to have any of that to give your students a chance to look at plants under a microscope. The images included in this blog were captured using clover, thyme, grass, and some weeds I found in my yard. As long as the leaf is thin enough to allow light to pass through it, you can use it for this exercise.

Spring is the perfect time for this activity. The weather is great for extending your classroom lessons to the outdoors where there are plenty of leaf specimens for your students to explore.

After a seed germinates, the seedling will grow out of the soil. As the seedling produces leaves, the plant begins the process of photosynthesis and makes food from sunlight and carbon dioxide. Chloroplasts (membrane enclosed organelles that contain the green chemical chlorophyll) can be found inside the plant’s cells. Chloroplasts are the structures responsible for photosynthesis. This explains why there is so much green outside during the spring!

Do all leaves look the same on the microscopic scale? What shape are plant cells? Are there other colors inside the leaves? These are the questions you will try to answer in this activity.

Materials/Procedure:
When outdoors, it is important to point out which plant leaves are safe and appropriate for students to pick for their microscopic observations.
- Materials:
- Science notebook
- Pen/pencil
- Colored pencils
- Classroom set of Foldscope 2.0s or Foldscope Minis
- Slides (glass or blank trading cards)
- Glass coverslips or clear stickers
- Tweezers
- Plant leaves (grass, clover, dandelion, etc.)

- Explain the plant life cycle, plant cells, photosynthesis, and chloroplasts.
- Ask students: Do all plant cells look the same?
- Create a graphical representation of the answers to this question.
- Go into more detail by asking them to explain their answer.
- Have students write their answers in their science notebooks.
- Give students a Foldscope and instruct them to find three different types of leaves.
- Students should draw and describe the leaves in their science notebooks. Use color in the drawing.
- Mount the leaves on slides.
- Use tweezers to take a small piece of the leaf off of the plant and place it on a slide.
- Cover the leaf with a coverslip or clear sticker.
- If using a glass coverslip, be sure to secure it in place with tape.
- Place the slide in the Foldscope and view the sample.
- Draw and describe the microscopic view of the leaf.
- Label the cell walls and chloroplasts.
- Use color in the drawing.
- NOTE: If using a Foldscope 2.0, observe the leaf using multiple magnifications.
- Refer back to the original question and, based on the observations, have students expand on and revise their answers if necessary.

Did you see anything that surprised you in your observations? What new questions do you have after viewing leaves under a Foldscope?

Extension:
This blog ties together the three dimensional framework of the NGSS. It covers the Disciplinary Core Idea of Life Science. Students will see the Crosscutting Concept of Patterns. This activity is also a way for students to deepen their understanding of the Science and Engineering Practice of Analyzing and Interpreting Data.

However, this exploratory activity can go beyond the science classroom. Join forces with:
- a math teacher to determine how shapes fit inside of a leaf using a 3D model,
- and a visual art teacher to explore the concepts of hue, value, and saturation as they relate to the color green!

Connect:
Share your observations, discoveries, pictures, and interdisciplinary extension activities with the Foldscope community. Submitting your Foldscope images related to the topic to the Microcosmos will help build up a strong scientific database that can help support new and innovative scientific research!


